프론트엔드/Component
[Component] MUI를 이용한 채팅 박스 컴포넌트
순코딩
2023. 8. 11. 20:24
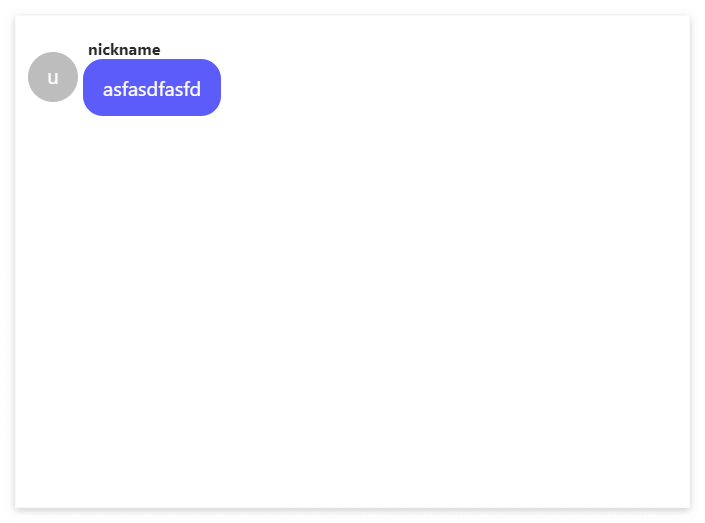
미리보기
사용방법
1. MUI 설치
1.1 작업 폴더에서 터미널을 켠다 VSC단축키(Ctrl + ` (esc 밑에 있는 거))
1.2 아래 코드를 순서대로 터미널에 입력한다.
npm install @mui/material @emotion/react @emotion/styled
npm install @mui/material @mui/styled-engine-sc styled-components
npm install @fontsource/roboto
npm install @mui/icons-material

// 참고 링크
//https://mui.com/material-ui/getting-started/installation/
2. 컴포넌트 만들기
2.1 ChatTest.jsx 파일을 생성하고 아래 코드를 복사+붙여넣기 한다.
import * as React from "react";
import Avatar from "@mui/material/Avatar";
import Box from "@mui/material/Box";
import styled from "@emotion/styled";

//채팅 wrap
const ChatWrap = styled.div`
  display: flex;
  align-items: center;
`;

//채팅 프로필 사진
const ChatAvatar = styled(Avatar)`
  width: 50px;
  height: 50px;
  margin-right: 5px;
`;

//채팅 닉네임
const ChatNickName = styled.div`
  margin-left: 5px;
  font-weight: bold;
  color: #282828;
`;

//채팅 박스
const ChatBox = styled(Box)`
  //위치
  //정렬
  text-align: center;
  //크기
  padding: 15px 20px;
  //디자인
  background-color: #5c5cfb;
  border-radius: 20px;
  color: white;
  font-size: 20px;
`;

const ChatTest = () => {
  return (
    <>
      <ChatWrap>
        {/* 프로필 이미지 */}
        <ChatAvatar alt="user" src="/static/images/avatar/1.jpg" />
        <div>
          <ChatNickName>nickname</ChatNickName>
          <ChatBox>asfasdfasfd</ChatBox>
        </div>
      </ChatWrap>
    </>
  );
};

export default ChatTest;
3. 사용하기
3.1 컴포넌트를 사용하고 싶은 곳에 <ChatTest/> 를 넣는다